
gdc 实战
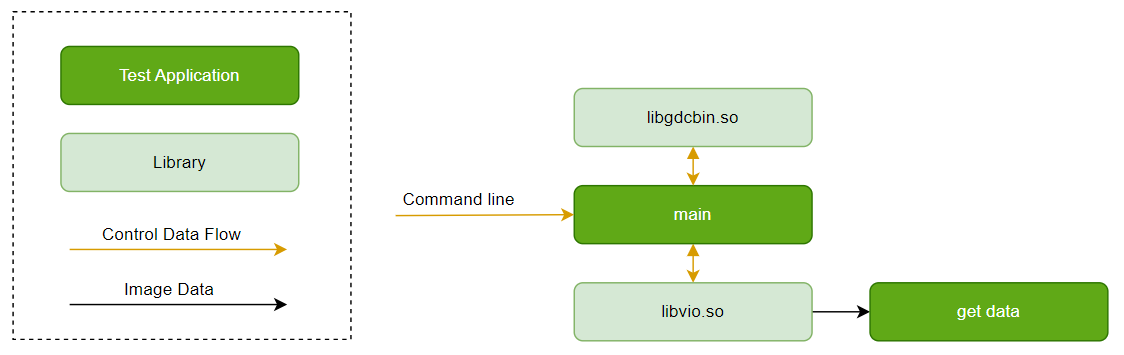
软件架构
本文的demo sample采用回灌流程,即从系统存储中读取文件,作为GDC的输入图像。
依赖 ``libgdcbin.so`` 将GDC坐标点通过计算生成二进制bin文件,调用VIO API实现整个数据通路,完成GDC处理。
软件控制图如下:
代码位置及目录结构
本sample的代码位于工程目录:``{sdk_dir}/test/samples/platform_samples/source/S83_Sample/S83E04_Module/gdc_sample``;
目录结构如下:
gdc_sample/
├── Kconfig
├── Makefile
├── Makefile.in
├── cfg
├── res
└── src
├── gdc_json_parser.h
├── gdc_sample.c
└── Makefile
根目录包含 ``Kconfig`` 和外部接口的 ``Makefile`` , ``Kconfig`` 用于控制该demo是否加入整体编译;\
cfg目录中包含了VPM配置文件;res目录中包含了资源文件,如YUV图像、GDC配置文件、GDC坐标点txt文件等;\
src目录下的 ``Makefile`` 用于src目录下的编译, ``gdc_sample.c`` 是main入口的所在文件。
API流程图如下:
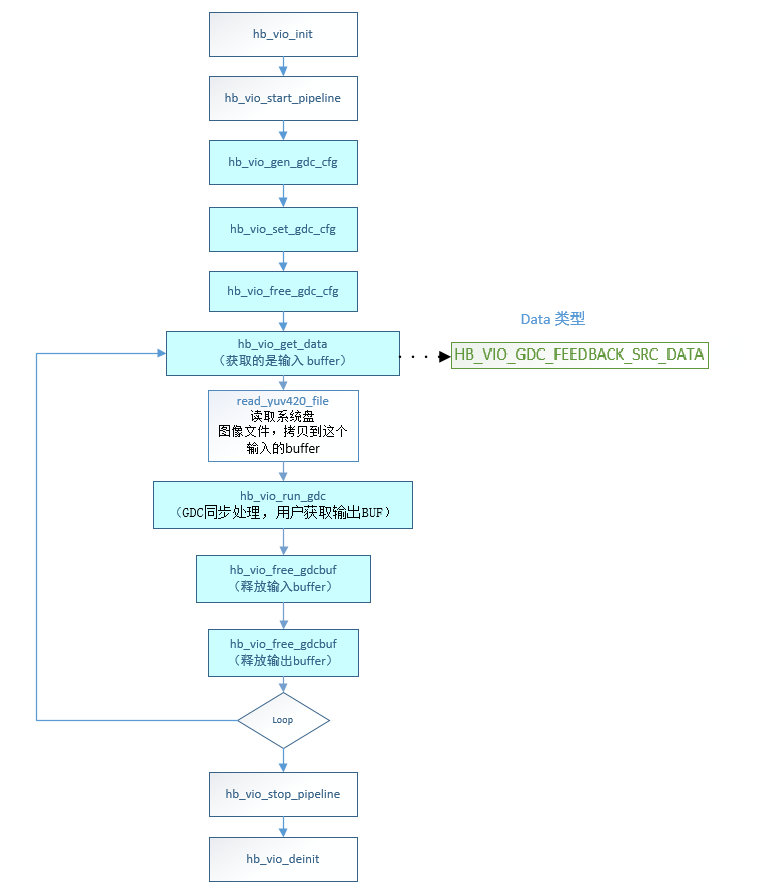
主干代码:
int gdc_gdcfeedback_sample(void)
{
int ret = OK;
int loop_cnt = 0;
hb_vio_buffer_t src_buf = {0};
hb_vio_buffer_t dst_buf = {0};
/* 1. init vps */
ret = hb_vio_init(g_vpm_config);
if (ret < 0) {
gdc_print_err("hb_vio_init err\n");
goto err1;
}
ret = hb_vio_start_pipeline(g_gdc_default_pipe);
if (ret < 0) {
gdc_print_err("vpm start %d err!, ret = %d\n", g_gdc_default_pipe, ret);
goto err1;
}
/* 2. init gdc and set gdc */
ret = gdc_cfg_bin_update(g_gdc_default_pipe, g_gdc_config);
if (ret < 0) {
gdc_print_err("gdc_cfg_bin_update err\n");
return -1;
}
/* 3. start gdc process */
while(loop_cnt < g_loop_count) {
// get src buf form vpm
loop_cnt++;
ret = hb_vio_get_data(g_gdc_default_pipe, HB_VIO_GDC_FEEDBACK_SRC_DATA, &src_buf);
if (ret < 0) {
gdc_print_err("vio get gdc_buffer fail,pipeline=%d\n", g_gdc_default_pipe);
usleep(300 * 1000);
continue;
}
// push yuv data to src_buf
int img_size = src_buf.img_addr.stride_size * src_buf.img_addr.height;
read_yuv420_file(g_yuv_file,
src_buf.img_addr.addr[0],
src_buf.img_addr.addr[1],
img_size);
// run gdc
ret = hb_vio_run_gdc(g_gdc_default_pipe, &src_buf, &dst_buf, g_gdc_degree);
if (ret < 0) {
gdc_print_err("hb_vio_run_gdc error! ret = %d\n", ret);
return -1;
}
// show or save buf
gdc_dst_show_and_save(&src_buf, &dst_buf, loop_cnt);
// free buffer
hb_vio_free_gdcbuf(g_gdc_default_pipe, &src_buf);
hb_vio_free_gdcbuf(g_gdc_default_pipe, &dst_buf);
usleep(100);
}
err1:
// free buf
ret = hb_vio_deinit();
if (ret < 0) {
gdc_print_err("hb_vin_deinit err\n");
return ERR;
}
return ret;
}
``gdc.bin`` 生成代码:
static int gdc_cfg_bin_gen(const char *layout_file, char* config_file, void **cfg_buf, uint64_t *config_size)
{
int ret = 0;
window_t* windows = NULL;
uint32_t wnd_num = 0;
param_t gdc_param;
FILE* f = fopen(layout_file, "r");
if (!f) {
gdc_print_err("Can't open gdc layout file %s\n", layout_file);
return -1;
}
fseek(f, 0, SEEK_END);
size_t json_sz = ftell(f);
char* json = (char*)malloc(json_sz+1);
rewind(f);
json[fread(json, sizeof(char), json_sz, f)] = 0;
fclose(f);
memset(&gdc_param, 0, sizeof(gdc_param));
if (gdc_parse_json(json, &gdc_param, &windows, &wnd_num)) {
gdc_print_err("ERROR: Can't process json\n");
gdc_parse_json_clean(&windows, wnd_num);
return -1;
}
free(json);
json = NULL;
if(gdc_param.format == FMT_UNKNOWN) {
gdc_print_err("Can't process json: unknown frame format.\n");
gdc_parse_json_clean(&windows, wnd_num);
return -1;
}
if(wnd_num == 0) {
gdc_print_err("Warning: no windows are specified.\n");
gdc_parse_json_clean(&windows, wnd_num);
return -1;
}
ret = hb_vio_gen_gdc_cfg(&gdc_param,
windows,
wnd_num,
cfg_buf,
config_size);
if (ret == 0 && config_file != NULL) {
FILE *f = fopen(config_file, "wb");
if (f != NULL) {
fwrite(*cfg_buf, sizeof(char), *config_size, f);
fclose(f);
}
}
gdc_print_info("gdc gen cfg_buf %p, size %lu \n", *cfg_buf, *config_size);
gdc_parse_json_clean(&windows, wnd_num);
return ret;
}
static int gdc_cfg_bin_update(uint32_t pipe_id, const char *layout_file)
{
int ret = 0;
uint32_t *cfg_buf = NULL;
uint64_t config_size = 0;
ret = gdc_cfg_bin_gen(layout_file, (char *)"./gdc.bin", (void **)&cfg_buf, &config_size); // NOLINT
if (ret == 0) {
gdc_print_info("pipe(%u) cfg_buf(%p) size(%lu)\n",
pipe_id, cfg_buf, config_size);
ret = hb_vio_set_gdc_cfg(pipe_id, cfg_buf, config_size);
if (cfg_buf) {
hb_vio_free_gdc_cfg(cfg_buf);
gdc_print_info("free config_buf %p size(%lu). \n", cfg_buf, config_size);
cfg_buf = NULL;
}
if (ret < 0) {
gdc_print_err("gdc cfg bin set failed.\n");
return -1;
}
} else {
gdc_print_err("gdc cfg bin gen failed.\n");
return -1;
}
gdc_print_info("pipe(%u)gdc bin update done.File %s size %lu\n", pipe_id, layout_file, config_size);
hb_vio_free_gdc_cfg(cfg_buf);
return ret;
}
本sample编译依赖VPS系统相关的头文件:
#include "hb_vin_data_info.h"
#include "hb_vpm_data_info.h"
#include "hb_vio_interface.h"
编译依赖的库有如下:
LIBS += -lvio -lpthread -lalog -lhbmem -lgdcbin
编译命令:
# 进入SDK所在目录{sdk_dir},并source构建环境(参见上)。
# 编译本sample:
bdm libvio-gdc-sample
# 输出文件:
{sdk_dir}/out/debug-gcc_{gcc_version}/build/test/samples/platform_samples/source/S83_Sample/S83E04_Module/gdc_sample
Matrix 6E/M
板端部署及配置
刷写系统软件镜像后,本sample的可执行文件位于板端:``/app/sample/S83_Sample/S83E04_Module/gdc_sample/bin/gdc_sample``;
需要用到的VPM配置文件 ``vpm_config.json`` 位于板端:``/app/sample/S83_Sample/S83E04_Module/gdc_sample/cfg/``、
GDC配置文件 ``layout.json`` 和参考输入yuv图像位于板端:``/app/sample/S83_Sample/S83E04_Module/gdc_sample/res/``,
用户也可以通过 ``mount -o rw,remount /app`` 指令将 ``/app`` 分区权限变更为可读写后进行修改。
运行指南
本文的demo sample以affine模式(线性变换)和custom模式(用户定制的变换,可定制用于变换的网格)两种变换模式为例。
affine模式旋转0度,执行命令:
/app/sample/S83_Sample/S83E04_Module/gdc_sample/bin/gdc_sample \
-v /app/sample/S83_Sample/S83E04_Module/gdc_sample/cfg/ddr_gdc0_1080p/vpm_config.json \
-g /app/sample/S83_Sample/S83E04_Module/gdc_sample/res/1080p_0_affine.json \
-y /app/sample/S83_Sample/S83E04_Module/gdc_sample/res/1080p.yuv -p 0 -l 1 -s 1 -d 0
affine模式旋转90度,执行命令:
/app/sample/S83_Sample/S83E04_Module/gdc_sample/bin/gdc_sample \
-v /app/sample/S83_Sample/S83E04_Module/gdc_sample/cfg/ddr_gdc0_1080p_rotate_90/vpm_config.json \
-g /app/sample/S83_Sample/S83E04_Module/gdc_sample/res/1080p_90_affine.json \
-y /app/sample/S83_Sample/S83E04_Module/gdc_sample/res/1080p.yuv -p 0 -l 1 -s 1 -d 90
affine模式旋转180度,执行命令:
/app/sample/S83_Sample/S83E04_Module/gdc_sample/bin/gdc_sample \
-v /app/sample/S83_Sample/S83E04_Module/gdc_sample/cfg/ddr_gdc0_1080p/vpm_config.json \
-g /app/sample/S83_Sample/S83E04_Module/gdc_sample/res/1080p_180_affine.json \
-y /app/sample/S83_Sample/S83E04_Module/gdc_sample/res/1080p.yuv -p 0 -l 1 -s 1 -d 180
affine模式旋转270度,执行命令:
/app/sample/S83_Sample/S83E04_Module/gdc_sample/bin/gdc_sample \
-v /app/sample/S83_Sample/S83E04_Module/gdc_sample/cfg/ddr_gdc0_1080p_rotate_90/vpm_config.json \
-g /app/sample/S83_Sample/S83E04_Module/gdc_sample/res/1080p_270_affine.json \
-y /app/sample/S83_Sample/S83E04_Module/gdc_sample/res/1080p.yuv -p 0 -l 1 -s 1 -d 270
custom模式校正前视畸变图像,执行命令:
/app/sample/S83_Sample/S83E04_Module/gdc_sample/bin/gdc_sample \
-v /app/sample/S83_Sample/S83E04_Module/gdc_sample/cfg/ddr_gdc0_720p/vpm_config_560x258.json \
-g /app/sample/S83_Sample/S83E04_Module/gdc_sample/res/camera_0_layout.json \
-y /app/sample/S83_Sample/S83E04_Module/gdc_sample/res/720p_fisheye_0.yuv -p 0 -l 1 -s 1
custom模式校正右视畸变图像,执行命令:
/app/sample/S83_Sample/S83E04_Module/gdc_sample/bin/gdc_sample \
-v /app/sample/S83_Sample/S83E04_Module/gdc_sample/cfg/ddr_gdc0_720p/vpm_config_272x516.json \
-g /app/sample/S83_Sample/S83E04_Module/gdc_sample/res/camera_2_layout.json \
-y /app/sample/S83_Sample/S83E04_Module/gdc_sample/res/720p_fisheye_2.yuv -p 0 -l 1 -s 1
custom模式校正后视畸变图像,执行命令:
/app/sample/S83_Sample/S83E04_Module/gdc_sample/bin/gdc_sample \
-v /app/sample/S83_Sample/S83E04_Module/gdc_sample/cfg/ddr_gdc0_720p/vpm_config_560x258.json \
-g /app/sample/S83_Sample/S83E04_Module/gdc_sample/res/camera_1_layout.json \
-y /app/sample/S83_Sample/S83E04_Module/gdc_sample/res/720p_fisheye_1.yuv -p 0 -l 1 -s 1
custom模式校正左视畸变图像,执行命令:
/app/sample/S83_Sample/S83E04_Module/gdc_sample/bin/gdc_sample \
-v /app/sample/S83_Sample/S83E04_Module/gdc_sample/cfg/ddr_gdc0_720p/vpm_config_272x516.json \
-g /app/sample/S83_Sample/S83E04_Module/gdc_sample/res/camera_3_layout.json \
-y /app/sample/S83_Sample/S83E04_Module/gdc_sample/res/720p_fisheye_3.yuv -p 0 -l 1 -s 1
运行命令行说明
``gdc_sample`` :应用程序名字。
下面的表格是具体参数的说明:
================ ================================================================================= ================
参数名 用法 是否必需
================ ================================================================================= ================
-v 指定VPM的配置文件 是
-g 指定GDC的配置文件 是
-p 指定pipeline id 是
-y 指定输入的YUV图像文件 是
-l 指定每个pipeline运行的循环次数 否
-s 指定是否保存输出YUV图像文件,0:否,1:是 否
-d 指定旋转角度 否
================ ================================================================================= ================
例如上面的affine模式旋转0度,执行命令:
/app/sample/S83_Sample/S83E04_Module/gdc_sample/bin/gdc_sample \
-v /app/sample/S83_Sample/S83E04_Module/gdc_sample/cfg/ddr_gdc0_1080p/vpm_config.json \
-g /app/sample/S83_Sample/S83E04_Module/gdc_sample/res/1080p_0_affine.json \
-y /app/sample/S83_Sample/S83E04_Module/gdc_sample/res/1080p.yuv -p 0 -l 1 -s 1 -d 0
- ``-v`` 参数 ``/app/sample/S83_Sample/S83E04_Module/gdc_sample/cfg/ddr_gdc0_1080p/vpm_config.json`` 代表VPM配置文件所在位置,json里面的具体配置可参考vps配置文件说明。
- ``-g`` 参数 ``/app/sample/S83_Sample/S83E04_Module/gdc_sample/res/1080p_0_affine.json`` 代表GDC的配置文件所在位置,json里面的具体配置可参考GDC配置文件说明。
- ``-p`` 参数为0,代表使能pipe0数据流。
- ``-y`` 参数 ``/app/sample/S83_Sample/S83E04_Module/gdc_sample/res/1080p.yuv`` 指定输入的YUV图像文件。
- ``-l`` 参数为1,代表运行循环次数为1。
- ``-s`` 参数为1,代表保存输出YUV图像文件在当前目录下。
- ``-d`` 参数为0,代表GDC图像旋转角度为0。
帮助菜单:
**********************show help**********************
Usage: ./gdc_sample
-v --vpm_config_file vpm.json
-g --gdc_config_file gdc.json
-p --cam_default_pipe configure the default pipeline id
-y --input_yuv_img_file input yuv420sp file
-l --loop_count loop count for every pipe running
-s --save_to_yuvfile 0: off, 1: save 1 yuv file
-d --degree_config degree of rotation
Example:
./gdc_sample -v vpm.json -g gdc.json -y 1080p.yuv -p 0 -l 10 -s 1 -d 0
********************show help end********************
运行结果说明
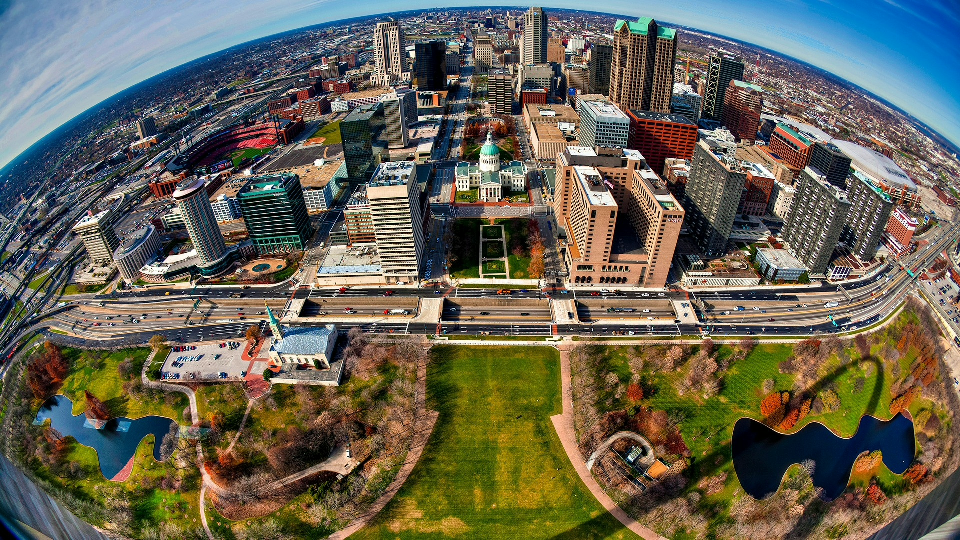
affine模式输入原始图像均为下图:
affine模式旋转0度,执行结果:

输出图像gdc_out_1920x1080_1.yuv:

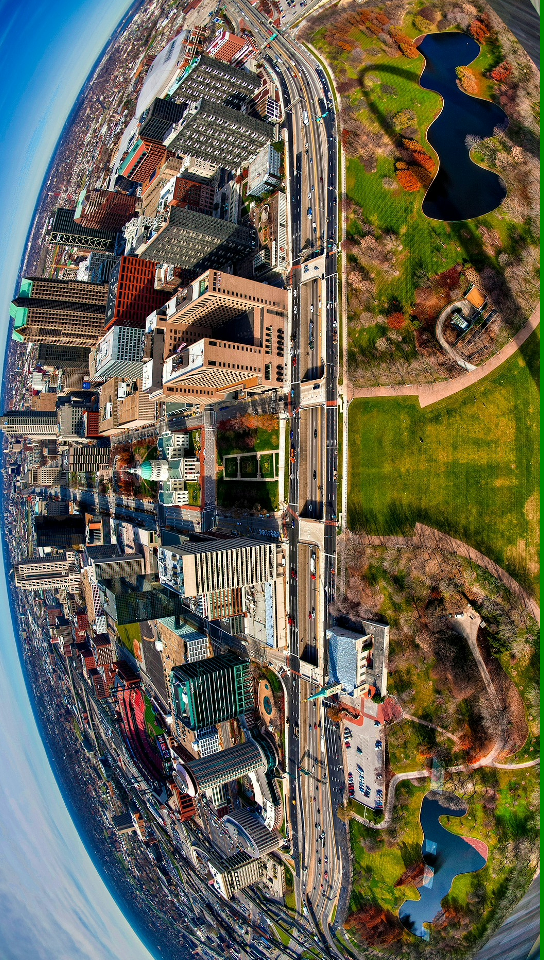
affine模式旋转90度,执行结果:

输出图像gdc_out_1088x1920_1.yuv:
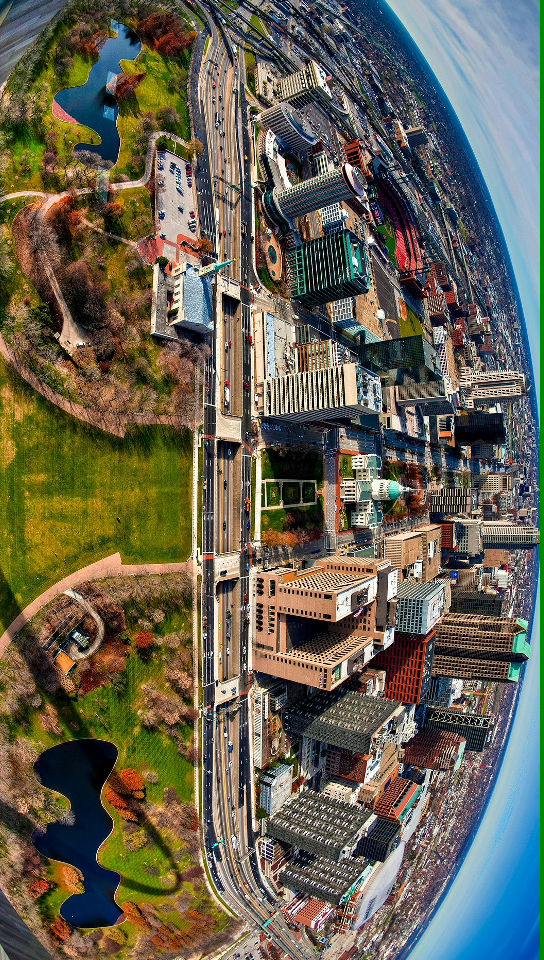
注意:1920x1080的图片旋转后的width是1080,分配buffer和设置都会把这个size align到16对齐,即1080变成1088,因此上图最右边的图片绿边是正常现象。
affine模式旋转180度,执行结果:

输出图像gdc_out_1920x1080_1.yuv:

affine模式旋转270度,执行结果:

输出图像gdc_out_1088x1920_1.yuv:
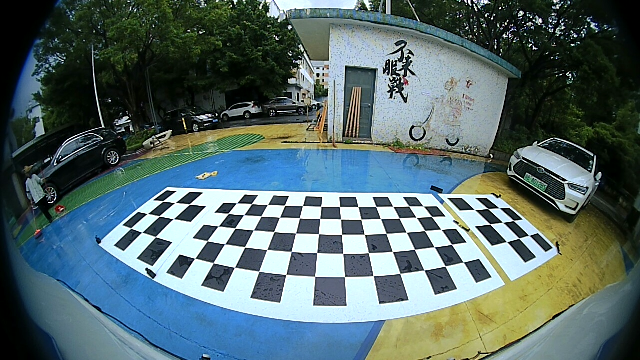
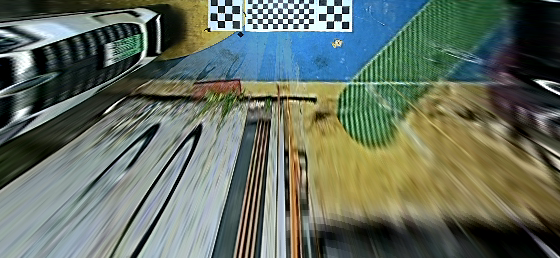
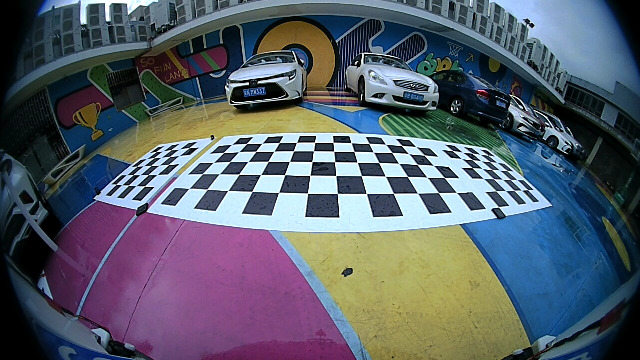
custom模式校正前视畸变图像,执行结果:

输入图像:
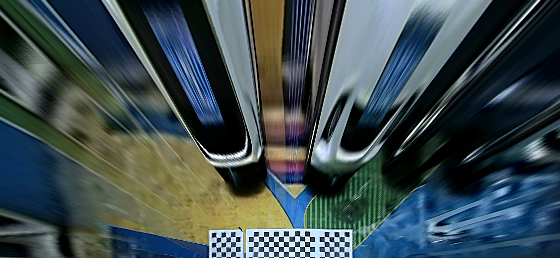
输出图像gdc_out_560x258_1.yuv:
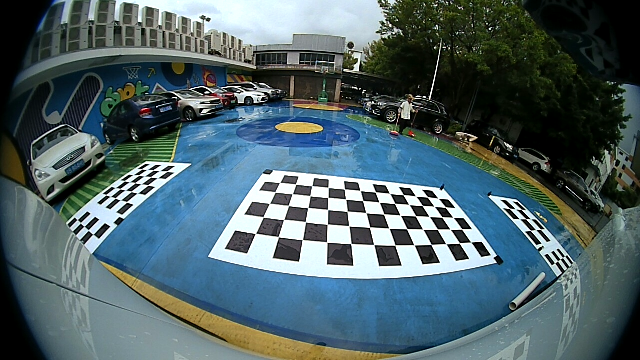
custom模式校正右视畸变图像,执行结果:

输入图像:
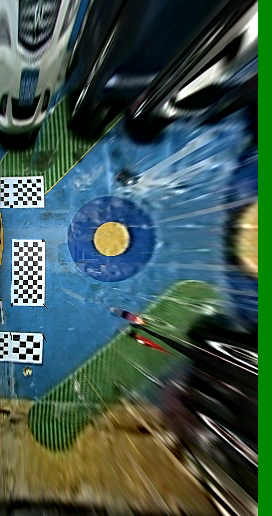
输出图像gdc_out_272x516_1.yuv:

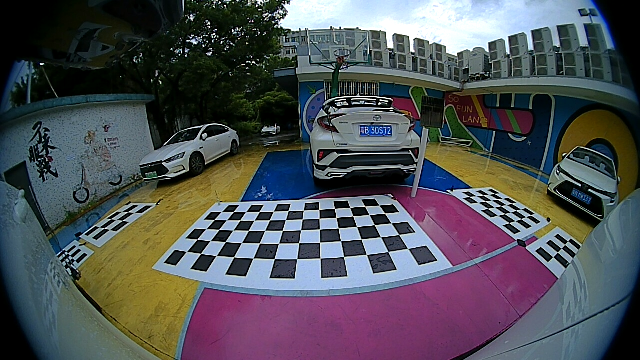
custom模式校正后视畸变图像,执行结果:

输入图像:
输出图像gdc_out_560x258_1.yuv:
custom模式校正左视畸变图像,执行结果:

输入图像:
输出图像gdc_out_272x516_1.yuv:
'/%3e%3cpath%20d='M8%200.5C12.1421%200.5%2015.5%203.85786%2015.5%208C15.5%2012.1421%2012.1421%2015.5%208%2015.5C3.85786%2015.5%200.5%2012.1421%200.5%208C0.5%203.85786%203.85786%200.5%208%200.5Z'%20fill='url(%23paint1_linear_0_45845)'%20stroke='white'/%3e%3cpath%20d='M10.0597%204.5332C10.031%204.5332%2010.0036%204.54817%209.98859%204.57313L8.09724%207.79442C8.02613%207.90046%207.84897%208.23731%207.5483%208.7875C7.37863%209.0969%207.25387%209.32771%207.17152%209.48615C7.1341%209.55727%207.0293%209.53855%207.01807%209.45871C6.97191%209.11936%206.89456%208.6066%206.78727%207.91793L6.2483%204.61804C6.24207%204.57812%206.20713%204.54942%206.16721%204.54942H4.28085C4.2297%204.54942%204.18977%204.59683%204.201%204.64798L5.71059%2012.1959C5.71808%2012.2346%205.75176%2012.2621%205.79044%2012.2621H7.46845C7.49715%2012.2621%207.52335%2012.2471%207.53832%2012.2234L12.1869%204.65796C12.2205%204.60307%2012.1806%204.5332%2012.117%204.5332H10.0597Z'%20fill='white'/%3e%3cdefs%3e%3clinearGradient%20id='paint0_linear_0_45845'%20x1='8.99711'%20y1='15.3526'%20x2='47.3575'%20y2='15.3526'%20gradientUnits='userSpaceOnUse'%3e%3cstop%20stop-color='%23AF86FF'/%3e%3cstop%20offset='1'%20stop-color='%23774EFF'/%3e%3c/linearGradient%3e%3clinearGradient%20id='paint1_linear_0_45845'%20x1='1.1152'%20y1='15.1368'%20x2='15.3888'%20y2='15.1368'%20gradientUnits='userSpaceOnUse'%3e%3cstop%20stop-color='%23AF86FF'/%3e%3cstop%20offset='1'%20stop-color='%23774EFF'/%3e%3c/linearGradient%3e%3c/defs%3e%3c/svg%3e)