7.4.1. 浮点模型的要求
7.4.1.1. symbolic_trace
和 PyTorch 的量化感知训练类似,horizon_plugin_pytorch 基于 fx 设计和开发,因此,要求浮点模型必须是可以正确的完成 symbolic_trace 的
7.4.1.2. 仅支持部分算子
由于 BPU 只支持数量有限的算子,因此,horizon_plugin_pytorch 只支持算子列表中的算子和基于 BPU 限制而内部特殊定义的特殊算子。
7.4.1.3. 构建量化友好模型
浮点模型变为定点模型的过程存在一定的精度误差,越是量化友好的浮点模型, qat 精度提升越容易,量化后的精度也越高。一般而言,有以下几种情况会导致模型变得量化不友好:
使用有精度风险的算子。例如: softmax , layernorm 等(详见 op 文档),这类算子一般底层由查表或多个 op 拼接实现,容易发生掉点问题。
一次 forward 中多次调用同一算子。同一算子多次调用,对应的输出分布存在差异,但只会统计一组量化参数,当多次调用的输出分布差异过大时,量化误差会变大。
add , cat 等多输入算子的不同输入差异过大,可能造成较大误差。
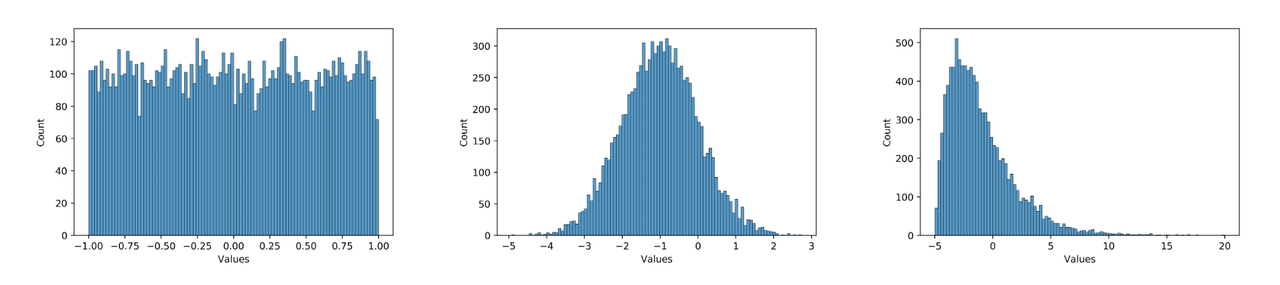
数据分布不合理。plugin 采用的是均匀对称量化,所以 0 均值的均匀分布最好,应尽量避免长尾和离群点。同时,数值范围需要与量化 bit 相匹配,如果使用int8量化分布为 [-1000, 1000] 均匀分布的数据,那么精度显然也是不够的。例如,下面三个分布图,从左到右对量化的友好性依次递减,模型中大部分数值的分布应当为中间这种分布。在实际使用中,可以用 debug 工具查看模型 weight 和 feature map 的分布是否量化友好。因为模型冗余性的存在,有些看起来分布非常量化不友好的 op 并不会显著降低模型的最终精度,需要结合实际的 qat 训练难度和最后达到的量化精度综合考虑。
那么如何使得模型更加量化友好呢?具体来说:
尽量少使用精度风险过大的算子,详见 op 文档。
保证多次调用的共享算子每次调用的输出分布差异不要太大,或者将共享算子拆开分别单独使用。
避免多输入算子不同输入的数值范围差异过大。
使用 int16 量化数值范围和误差都非常大的 op 。可通过 debug 工具找到这类 op 。
通过调大 weight decay ,增加数据增强等方式防止模型过拟合。过拟合模型容易出现较大数值,且对输入非常敏感,轻微的误差可能导致输出完全错误。
使用 BN 。
对模型输入做关于0对称的归一化。
需要注意的是, qat 自身具有一定的调整能力,量化不友好并不代表不能量化,很多情况下,即使出现上面的不适合量化的现象,仍然可以量化得很好。因为上述建议也可能会导致浮点模型精度下降,所以应当在 qat 精度无法达标时再尝试上述建议,尤其是 1 - 5 条建议,最后应当是在浮点模型精度和量化模型精度中找一个平衡点。
7.4.2. qconfig 详解
7.4.2.1. 什么是 qconfig
模型的量化方式由 qconfig 决定,在准备 qat / calibration 模型之前,需要先给模型设置 qconfig。我们不推荐您自定义 qconfig,尽量只使用预定义好的qconfig变量,因为自定义 qconfig 需要对具体的处理器限制认知清晰,详细了解训练工具的工作原理,定义出错可能导致模型无法正常收敛、模型无法编译等问题,浪费大量时间和人力。
注意
目前,Plugin 中维护了两个版本的qconfig,早期版本的 qconfig 将在不久的将来被废弃,我们只推荐您使用此文档中介绍的 qconfig 用法。
7.4.2.2. 如何获取 qconfig
使用封装好的 qconfig 变量。这些 qconfig 存放在 horizon_plugin_pytorch/quantization/qconfig.py 中,可以适用于绝大多数情况。包括:
使用 get_default_qconfig 接口。此接口较固定 qconfig 变量更灵活,我们推荐您对量化和硬件限制有清晰认知之后再使用。常用参数和解释如下:
7.4.2.3. 如何设置 qconfig
共有三种设置方法,我们推荐您使用前两种,最后一种设置方式将废弃。
直接设置 qconfig 属性。此方法优先级最高,其余方法不会覆盖直接设置的 qconfig。
qconfig 模板。在 prepare 接口上指定 qconfig setter 和 example_inputs,自动为模型设置 qconfig。
qconfig_dict。在 prepare_qat_fx 接口上指定 qconfig_dict。此用法将逐步废弃,如无兼容性需求,不推荐再使用,这里不展开介绍。
7.4.2.4. qconfig 模板
长期以来,配置 qconfig 出错的问题经常发生,因此我们开发了 qconfig 模板。qconfig 模板基于 subclass trace 方案感知模型的图结构,并按设定的规则自动设置 qconfig,是我们最推荐的设置 qconfig 方法。用法如下:
注意
模板的优先级低于直接给模型设置 qconfig 属性,如果模型在 prepare 之前已经使用 model.qconfig = xxx 进行了配置,那么模板将不会生效。如果没有特殊需求,我们不推荐将两者混合使用,这很容易引发低级错误。绝大多数情况下,我们推荐您使用模板和 model.qconfig = xxx 两种设置方式中的一种即可满足需求。
模板可分为三类:
固定模板。固定模板中 calibration / qat / qat_fixed_act_scale 区别在于使用的 observer 类型和 scale 更新逻辑,分别用于校准,qat 训练,固定 activation scale qat 训练。default 模板( default_calibration_qconfig_setter / default_qat_qconfig_setter / default_qat_fixed_act_qconfig_setter )会做三件事:首先,将可以设置的高精度输出都设置上,对于不支持高精度的输出将给出提示;然后,从 grid sample 算子的 grid 输入向前搜索,直到出现第一个 gemm 类算子或者QuantStub,将中间的所有算子都设置为 int16。根据经验这里的 grid 一般表达范围较宽,int8 有较大可能不满足精度需求;最后,将其余算子设置为 int8。int16 模板( qat_8bit_weight_16bit_act_qconfig_setter / qat_8bit_weight_16bit_fixed_act_qconfig_setter / calibration_8bit_weight_16bit_act_qconfig_setter )会做两件事:首先,将可以设置的高精度输出都设置上,对于不支持高精度的输出将给出提示;其次,将其余算子设置为 int16。
敏感度模板。敏感度模板有 sensitive_op_calibration_8bit_weight_16bit_act_qconfig_setter, sensitive_op_qat_8bit_weight_16bit_act_qconfig_setter, sensitive_op_qat_8bit_weight_16bit_fixed_act_qconfig_setter,三者的区别和固定模板中三者的区别一致,也是分别用于校准,qat 训练,固定 activation scale qat 训练。 敏感度模板的第一个输入是精度 debug 工具产生的敏感度结果,第二个参数可以指定 ratio 或 topk ,敏感度模板会将量化敏感度最高的 topk 个算子设置为 int16。搭配固定模板,可以轻松实现混合精度调优。
自定义模板。自定义模板只有 ModuleNameQconfigSetter,需要传入模块名和对应 qconfig 的字典,一般用于设置 fixed scale 等特殊需求,可以和固定模板,敏感度模板搭配使用。
7.4.3. Calibration 指南
在量化中,一个重要的步骤是确定量化参数,合理的初始量化参数能够显著提升模型精度并加快模型的收敛速度。Calibration 就是在浮点模型中插入 Observer,使用少量训练数据,在模型 forward 过程中统计各处的数据分布,以确定合理的量化参数的过程。虽然不做 Calibration 也可以进行量化感知训练,但一般来说,它对量化感知训练有益无害,所以推荐用户将此步骤作为必选项。
7.4.3.1. 流程和示例
Calibration 与 QAT 的整体流程如下图所示:
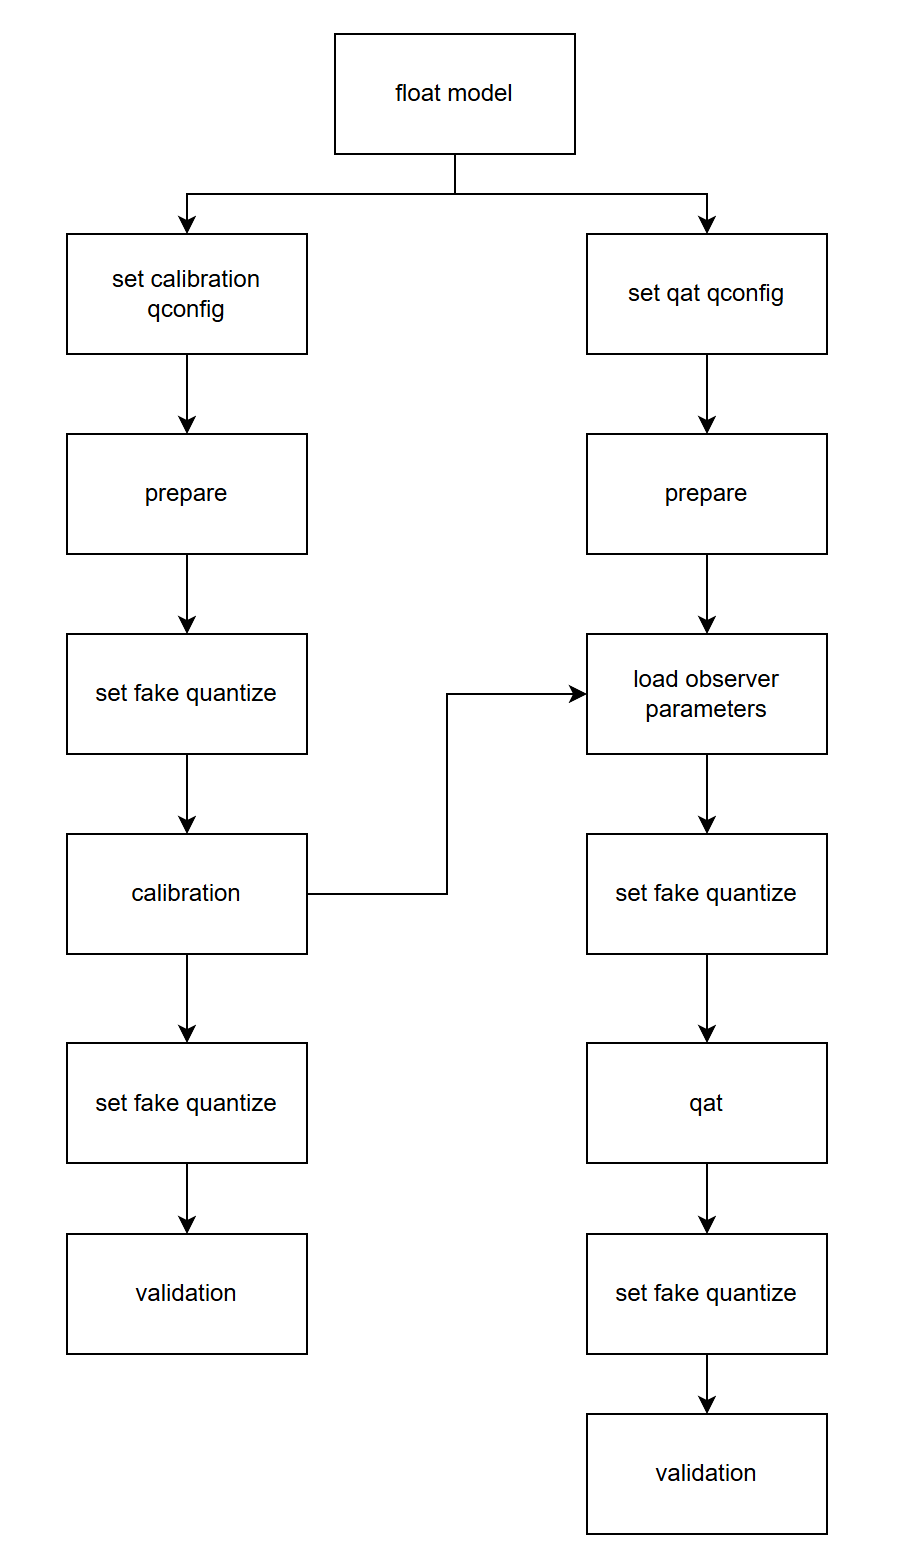
下面分别介绍各个步骤:
构建并训练浮点模型。参考 horizon_plugin_pytorch 快速入门章节中的 获取浮点模型 小节内容。
在浮点模型上插入 Observer 节点。参考 horizon_plugin_pytorch 快速入门章节中的 Calibration 小节内容。使用 prepare_qat_fx 方法转化浮点模型前,需要为模型设置 qconfig 。
get_default_qconfig 可以为 weight 和 activation 设置不同的 observer 。目前,calibration 可选 observer 有 “min_max”、 “percentile”、 “mse”、 “kl” 和 “mix”。如无特殊需求,weight_observer 推荐使用默认的 “min_max”,activation_observer 推荐使用 “mse”。特殊用法和调试技巧见下面的常见算法介绍。
fake_quant 参数对 Calibration 结果无影响,保留默认状态即可。
设置 fake quantize 状态为 CALIBRATION 。
fake quantize 一共有三种状态,分别需要在 QAT 、 calibration 、 validation 前将模型的 fake quantize 设置为对应的状态。在 calibration 状态下,仅观测各算子输入输出的统计量。在 QAT 状态下,除观测统计量外还会进行伪量化操作。而在 validation 状态下,不会观测统计量,仅进行伪量化操作。
calibration。把准备好的校准数据喂给模型,模型在 forward 过程中由 observer 观测相关统计量。
设置模型状态为 eval 并设置 fake quantize 状态为 VALIDATION 。
验证 calibration 效果。如果效果满意,则可以直接将模型转为定点或在此基础上进行量化感知训练,不满意则调整 calibration qconfig 中的参数继续 calibration。
7.4.3.2. 常用算法介绍
注解
有关每个算子的参数说明,请参考文末 API 文档。
算法 | 速度排名 | 精度排名 | 易用性排名 |
|---|---|---|---|
min_max | 1 | 5 | 1 |
percentile | 2 | 4 | 4 |
mse | 5 | 1 | 2 |
kl | 4 | 2 | 3 |
mix | 3 | 2 | 1 |
常用的几种校准方法性能如上表所示,数字越小越好,速度表示相同数据校准耗时,精度表示该方法在大多数模型上的校准效果,易用性表示该方法的调参复杂度。
对于同一模型而言,不同方法不同参数的精度/速度会存在较大差别,最新的一些研究工作也表明,没有一种方法可以在所有模型上都取得最好的精度,需要针对地调整其参数。所以推荐用户对这几种校准方法都进行尝试。
min_max。此方法仅统计最大值最小值的滑动平均,用于快速确定 Batch size、average_constant 等通用参数,没有太多技巧。
percentile。此方法是所有方法中精度上限最高的,但也是调整起来最麻烦的,如果通过其他方法或本方法的默认参数就可以满足精度要求,那么不建议在调参上花太多时间。percentile 可调的参数一共有两个 bins、percentile。bins 越多,max 的候选项间隔越小,可供调整的粒度越细,但也意味着更高的计算耗时。建议先确定 percentile 再调整 bins,两者交替迭代缩小调参范围直至达到满意的效果。绝大部分情况下 bins 取 2048 提供的调整粒度完全足够,不需要单独调整这个参数。以下是一个模型的调参路径:
顺序
percentile
bins
精度
1
99.99
2048
53.75
2
99.99
4096
54.38
3
99.995
4096
16.25
4
99.985
4096
32.67
5
99.9875
4096
57.06
6
99.9875
8192
62.84
7
99.98875
8192
57.62
8
99.988125
8192
63.15
在这个例子中,可以看到仔细调整后,精度提升了大约 10%。 模型中不同 op 的输入输出之间存在很大差异,一组全局的 percentile 参数可能很难满足所有 op 的需求,对精度要求较高时,可以先通过上面的方法找到较好的全局参数,再通过 debug 工具找到误差较大的几个 op,单独为这几个 op 设置 percentile 参数,设置方式参照 qconfig 设置。下面列举几种常见的容易导致误差较大的数据分布:
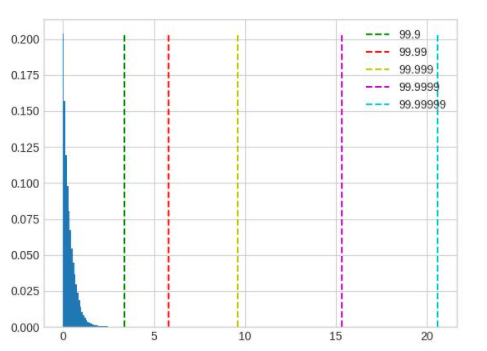
超长尾分布,percentile 的取值应当小一些,图中 99.9 是较好的取值。
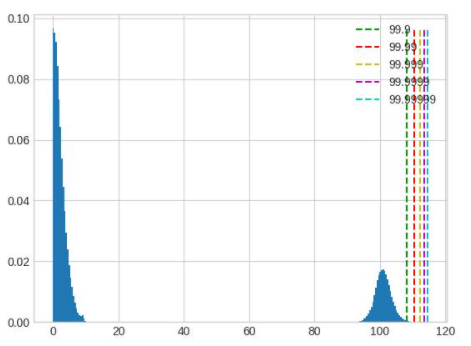
值域过大,且分布并不集中在一处,这种情况无论是保留尾部还是忽略尾部都会带来较大的精度损失,应该在训练浮点模型时通过调整 weight decay 等参数避免这种情况的出现。
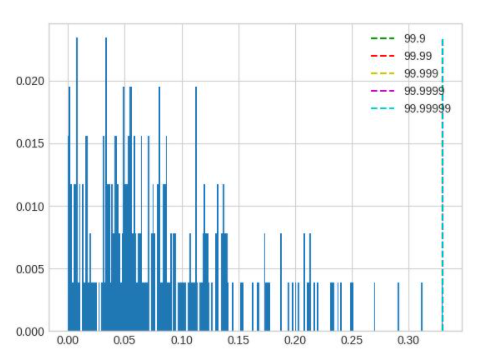
layernorm 的输出分布会呈现出若干集中度非常高的区域,此时 percentile 按照正常方法调整对于量化结果不会有任何影响,需要将 percentile 调整幅度增加。
mse。可调整的参数只有 stride,默认 stride 为 1,会逐步尝试最大值的 100 分位并选出量化反量化前后误差最小(L2 距离)的分位对应的值。此方法对大模型耗时较高,在合理范围内调大 stride 可以在保证精度的前提下减少耗时,stride 调整过大会影响精度。注意,调整此方法的参数只能优化耗时,并不能显著提升精度。
kl。可调的参数一共有两个 bin 和 update_interval。由于此方法耗时过长,不建议调整默认 bin。update_interval 默认为 1,表示间隔多少个 forward step 计算一次 KL,调大可以减少耗时(不影响精度),但需要保证 update_interval 不超过总的 calibration step,否则无法得到正常的量化参数。一般推荐直接将 update_interval 设为 calibration step,这样前面的 forward step 只采集数据更新直方图,只有最后一个 step 才会计算 KL 和 scale,可以最大程度减少 KL 的耗时,同时由于最终的直方图包含所有输入数据的统计信息,因此不会对精度造成影响。
mix。此方法为混合校准,对于每一个需要统计的地方,都会尝试 percentile 方法的不同参数,选出量化反量化前后误差最小(L2 距离)的方法。自动化程度较高,没有需要调整的参数。
7.4.3.3. 调参技巧
calibration 数据越多越好,但因为边际效应的存在,当数据量大到一定程度后,对精度的提升将非常有限。如果训练集较小,可以全部用来 calibration,如果训练集较大,可以结合 calibration 耗时挑选大小合适的子集,建议至少进行 10 - 100 个 step 的校准。
数据可以做水平翻转这类 augmentation,不要做马赛克这种 augmentation。尽量使用 infer 阶段的前处理 + 训练数据进行校准。
Batch size 尽可能大,如果数据噪声较大或模型离群点较多,可以适当减小。此参数应当在尝试 min max 方法时确定。
average_constant 表示每个 step 对最大值最小值的影响,average_constant 越小,当前 step 的影响越小,历史滑动均值的影响越大。该参数需要结合数据量在 0.01 ~ 0.5 之间调整。当数据量充足时(step > 100),average_constant 取 0.01,数据量不足时,average_constant 酌情增加,极端情况下,只有 2 个 step 的数据,average_constant 取 0.5。此参数应当在尝试 min max 方法时确定,之后其他方法都沿用此参数。
calibration 模型精度较好时,固定 feature map 的量化参数进行 QAT 训练可以取得更好的效果,精度较差时,则不能固定 calibration 得到的量化参数。关于精度是好还是坏,没有明确的标准,需要去尝试。比如:某模型精度为 100,如果 calibration 精度为 50,那么精度肯定称不上好,但如果 calibration 精度为 95,那么这个精度是否可以达到固定 feature map 量化参数的程度就需要尝试了,通常做法是固定与不固定都做实验进行对比。
优先尝试 min max 方法,该方法是速度最快的,用来跑通 calibration 流程,调整并确定 batch size 和 average_constant 两个参数,接着分别尝试 percentile、kl、mse 和 mix 四种方法并选取效果最好的方法。
7.4.3.4. Observer 参数文档
class horizon_plugin_pytorch.quantization.observer_v2.KLObserver(bins: int = 512, update_interval: int = 1, averaging_constant: float = 0.01, ch_axis: int = - 1, dtype: Union[torch.dtype, horizon_plugin_pytorch.dtype.QuantDType] = 'qint8', qscheme: torch.qscheme = torch.per_tensor_symmetric, quant_min: int = None, quant_max: int = None, is_sync_quantize: bool = False, factory_kwargs: Dict = None)
KL observer.
KL observer based on histogram. Histogram is calculated online and won’t be saved.
参数
bins – Number of histograms bins.
update_interval – Interval of computing KL entropy and update min/max. KLObserver will constantly collect histograms of activations, but only perform KL calculation when update_interval is satisfied. if it is set to 1, KL entropy will be computed every forward step. Larger interval guarantees less time and does no harm to calibration accuracy. Set it to the total calibration steps can achieve best performance. update_interval must be no greater than total calibration steps, otherwise no min/max will be computed.
averaging_constant – Averaging constant for min/max.
ch_axis – Channel axis.
dtype – Quantized data type.
qscheme – Quantization scheme to be used.
quant_min – Min quantization value. Will follow dtype if unspecified.
quant_max – Max quantization value. Will follow dtype if unspecified.
is_sync_quantize – If sync statistics when training with multiple devices.
factory_kwargs – kwargs which are passed to factory functions for min_val and max_val.
forward(x_orig)
Defines the computation performed at every call.
Should be overridden by all subclasses.
注解
Although the recipe for forward pass needs to be defined within this function, one should call the Module instance afterwards instead of this since the former takes care of running the registered hooks while the latter silently ignores them.
class horizon_plugin_pytorch.quantization.observer_v2.MSEObserver(stride: int = 1, averaging_constant: float = 0.01, ch_axis: int = - 1, dtype: Union[torch.dtype, horizon_plugin_pytorch.dtype.QuantDType] = 'qint8', qscheme: torch.qscheme = torch.per_tensor_symmetric, quant_min: int = None, quant_max: int = None, is_sync_quantize: bool = False, factory_kwargs: Dict = None)
MSE observer.
Observer module for computing the quantization parameters based on the Mean Square Error (MSE) between the original tensor and the quantized one.
This observer linear searches the quantization scales that minimize MSE.
参数
stride – Searching stride. Larger value gives smaller search space, which means less computing time but possibly poorer accuracy. Default is 1. Suggests no greater than 20.
averaging_constant – Averaging constant for min/max.
ch_axis – Channel axis.
dtype – Quantized data type.
qscheme – Quantization scheme to be used.
quant_min – Min quantization value. Will follow dtype if unspecified.
quant_max – Max quantization value. Will follow dtype if unspecified.
is_sync_quantize – If sync statistics when training with multiple devices.
factory_kwargs – kwargs which are passed to factory functions for min_val and max_val.
forward(x_orig)
Defines the computation performed at every call.
Should be overridden by all subclasses.
注解
Although the recipe for forward pass needs to be defined within this function, one should call the Module instance afterwards instead of this since the former takes care of running the registered hooks while the latter silently ignores them.
class horizon_plugin_pytorch.quantization.observer_v2.MinMaxObserver(averaging_constant: float = 0.01, ch_axis: int = - 1, dtype: Union[torch.dtype, horizon_plugin_pytorch.dtype.QuantDType] = 'qint8', qscheme: torch.qscheme = torch.per_tensor_symmetric, quant_min: int = None, quant_max: int = None, is_sync_quantize: bool = False, factory_kwargs: Dict = None)
Min max observer.
This observer computes the quantization parameters based on minimums and maximums of the incoming tensors. The module records the moving average minimum and maximum of incoming tensors, and uses this statistic to compute the quantization parameters.
参数
averaging_constant – Averaging constant for min/max.
ch_axis – Channel axis.
dtype – Quantized data type.
qscheme – Quantization scheme to be used.
quant_min – Min quantization value. Will follow dtype if unspecified.
quant_max – Max quantization value. Will follow dtype if unspecified.
is_sync_quantize – If sync statistics when training with multiple devices.
factory_kwargs – kwargs which are passed to factory functions for min_val and max_val.
forward(x_orig)
Record the running minimum and maximum of x.
class horizon_plugin_pytorch.quantization.observer_v2.MixObserver(averaging_constant: float = 0.01, ch_axis: int = - 1, dtype: Union[torch.dtype, horizon_plugin_pytorch.dtype.QuantDType] = 'qint8', qscheme: torch.qscheme = torch.per_tensor_symmetric, quant_min: int = None, quant_max: int = None, is_sync_quantize: bool = False, factory_kwargs: Dict = None)
Mix observer.
This observer computes the quantization parameters based on multiple calibration methods and selects the quantization parameters with the smallest quantization error.
参数
averaging_constant – Averaging constant for min/max.
ch_axis – Channel axis.
dtype – Quantized data type.
qscheme – Quantization scheme to be used.
quant_min – Min quantization value. Will follow dtype if unspecified.
quant_max – Max quantization value. Will follow dtype if unspecified.
is_sync_quantize – If sync statistics when training with multiple devices.
factory_kwargs – kwargs which are passed to factory functions for min_val and max_val.
forward(x_orig)
Defines the computation performed at every call.
Should be overridden by all subclasses.
注解
Although the recipe for forward pass needs to be defined within this function, one should call the Module instance afterwards instead of this since the former takes care of running the registered hooks while the latter silently ignores them.
class horizon_plugin_pytorch.quantization.observer_v2.PercentileObserver(percentile: float = 99.99, bins: int = 2048, averaging_constant: float = 0.01, ch_axis: int = - 1, dtype: Union[torch.dtype, horizon_plugin_pytorch.dtype.QuantDType] = 'qint8', qscheme: torch.qscheme = torch.per_tensor_symmetric, quant_min: int = None, quant_max: int = None, is_sync_quantize: bool = False, factory_kwargs: Dict = None)
Percentile observer.
Percentile observer based on histogram. Histogram is calculated online and won’t be saved. The minimum and maximum are moving averaged to compute the quantization parameters.
参数
percentile – Index percentile of histrogram
bins – Number of histograms bins.
averaging_constant – Averaging constant for min/max.
ch_axis – Channel axis.
dtype – Quantized data type.
qscheme – Quantization scheme to be used.
quant_min – Min quantization value. Will follow dtype if unspecified.
quant_max – Max quantization value. Will follow dtype if unspecified.
is_sync_quantize – If sync statistics when training with multiple devices.
factory_kwargs – kwargs which are passed to factory functions for min_val and max_val.
forward(x_orig)
Defines the computation performed at every call.
Should be overridden by all subclasses.
注解
Although the recipe for forward pass needs to be defined within this function, one should call the Module instance afterwards instead of this since the former takes care of running the registered hooks while the latter silently ignores them.
class horizon_plugin_pytorch.quantization.MovingAverageMinMaxObserver(averaging_constant=0.01, dtype=torch.qint8, qscheme=torch.per_tensor_symmetric, quant_min=None, quant_max=None, is_sync_quantize=False, factory_kwargs=None)
MovingAverageMinMax Observer.
Observer module for computing the quantization parameters based on the moving average of the min and max values.
This observer computes the quantization parameters based on the moving averages of minimums and maximums of the incoming tensors. The module records the average minimum and maximum of incoming tensors, and uses this statistic to compute the quantization parameters.
参数
averaging_constant – Averaging constant for min/max.
dtype – Quantized data type
qscheme – Quantization scheme to be used, only support per_tensor_symmetric scheme
reduce_range – Reduces the range of the quantized data type by 1 bit
quant_min – Minimum quantization value.
quant_max – Maximum quantization value.
is_sync_quantize – Whether use sync quantize
factory_kwargs – Arguments for register data buffer
forward(x_orig)
Record the running minimum and maximum of x.
class horizon_plugin_pytorch.quantization.MovingAveragePerChannelMinMaxObserver(averaging_constant=0.01, ch_axis=0, dtype=torch.qint8, qscheme=torch.per_channel_symmetric, quant_min=None, quant_max=None, is_sync_quantize=False, factory_kwargs=None)
MovingAveragePerChannelMinMax Observer.
Observer module for computing the quantization parameters based on the running per channel min and max values.
This observer uses the tensor min/max statistics to compute the per channel quantization parameters. The module records the running minimum and maximum of incoming tensors, and uses this statistic to compute the quantization parameters.
参数
averaging_constant – Averaging constant for min/max.
ch_axis – Channel axis
dtype – Quantized data type
qscheme – Quantization scheme to be used, Only support per_channel_symmetric
quant_min – Minimum quantization value.
quant_max – Maximum quantization value.
is_sync_quantize – whether use sync quantize
factory_kwargs – Arguments for register data buffer
forward(x_orig)
Defines the computation performed at every call.
Should be overridden by all subclasses.
注解
Although the recipe for forward pass needs to be defined within this function, one should call the Module instance afterwards instead of this since the former takes care of running the registered hooks while the latter silently ignores them.
7.4.4. 量化感知训练指南
量化感知训练通过在模型中插入一些伪量化节点,从而使得通过量化感知训练得到的模型转换成定点模型时尽可能减少精度损失。 量化感知训练和传统的模型训练无异,开发者可以从零开始,搭建一个伪量化模型,然后对该伪量化模型进行训练。 由于部署的硬件平台有诸多限制,对于开发者来说,搞清这些限制,并且根据这些限制搭建伪量化模型门槛较高。量化感知训练工具通过在开发者提供的浮点模型上根据部署平台的限制自动插入伪量化量化算子的方法,降低开发者开发量化模型的门槛。
量化感知训练由于施加了各种限制,因此,一般来说,量化感知训练比纯浮点模型的训练更加困难。量化感知训练工具的目标是降低量化感知训练的难度,降低量化模型部署的工程难度。
7.4.4.1. 流程和示例
虽然量化感知训练工具不强制要求用户从一个预训练的浮点模型开始,但是,经验表明,通常从预训练的高精度浮点模型开始量化感知训练能大大降低量化感知训练的难度。
注意
由于部署平台的底层限制,QAT 模型无法完全代表最终上板精度,请务必监控 quantized 模型精度,确保 quantized 模型精度正常,否则可能出现模型上板掉点问题。
由上述示例代码可以看到,与传统的纯浮点模型训练相比,量化感知训练多了两个步骤:
prepare_qat_fx
加载 Calibration 模型参数
7.4.4.1.1. prepare_qat_fx
这一步骤的目标是对浮点网络进行变换,插入伪量化节点。
7.4.4.1.2. 加载 Calibration 模型参数
通过加载 Calibration 得到的伪量化参数,来获得一个较好的初始化。
7.4.4.1.3. 训练迭代
至此,完成了伪量化模型的搭建和参数的初始化,然后就可以进行常规的训练迭代和模型参数更新,并且监控 quantized 模型精度。
7.4.4.2. 伪量化算子
量化感知训练和传统的浮点模型的训练主要区别在于插入了伪量化算子,并且,不同量化感知训练算法也是通过伪量化算子来体现的,因此,这里介绍一下伪量化算子。
注解
由于 BPU 只支持对称量化,因此,这里以对称量化为例介绍。
7.4.4.2.1. 伪量化过程
以 int8 量化感知训练为例,一般来说,伪量化算子的计算过程如下:
fake_quant_x = clip(round(x / scale),-128, 127) * scale
和 Conv2d 通过训练来优化 weight, bias 参数类似,伪量化算子要通过训练来优化 scale 参数。 然而,由于 round 作为阶梯函数,其梯度为 0,从而导致了伪量化算子无法直接通过梯度反向传播的方式进行训练。解决这一问题,通常有两种方案:基于统计的方法和基于“学习”的方法。
7.4.4.2.2. 基于统计的方法
量化地目标是把 Tensor 中的浮点数通过 scale 参数均匀地映射到 int8 表示的 [-128, 127] 的范围上。既然是均匀映射,那么很容易得到 scale 的计算方法:
由于 Tensor 中数据分布不均匀以及外点问题,又衍生了不同的计算 xmin 和 xmax 的方法。可以参考 MovingAverageMinMaxObserver 等。
在工具中的使用方法请参考 default_qat_8bit_fake_quant_qconfig 及其相关接口。
7.4.4.2.3. 基于学习的方法
虽然 round 的梯度为 0,研究者通过实验发现,在该场景下,如果直接设置其梯度为 1 也可以使得模型收敛到预期的精度。
在工具中的使用方法请参考 default_qat_8bit_lsq_quant_qconfig 及其相关接口。
有兴趣进一步了解的用户可以参考如下论文:Learned Step Size Quantization
7.4.5. 异构模型指南
7.4.5.1. 异构模型介绍
异构模型是部署时一部分运行在 BPU 上,一部分运行在 CPU 上的模型,而非异构模型部署时则完全运行在 BPU 上。通常情况下,以下两类模型在部署时会成为异构模型:
包含 BPU 不支持算子的模型。
由于量化精度误差过大,用户指定某些算子运行在 CPU 上的模型。
7.4.5.2. 使用流程
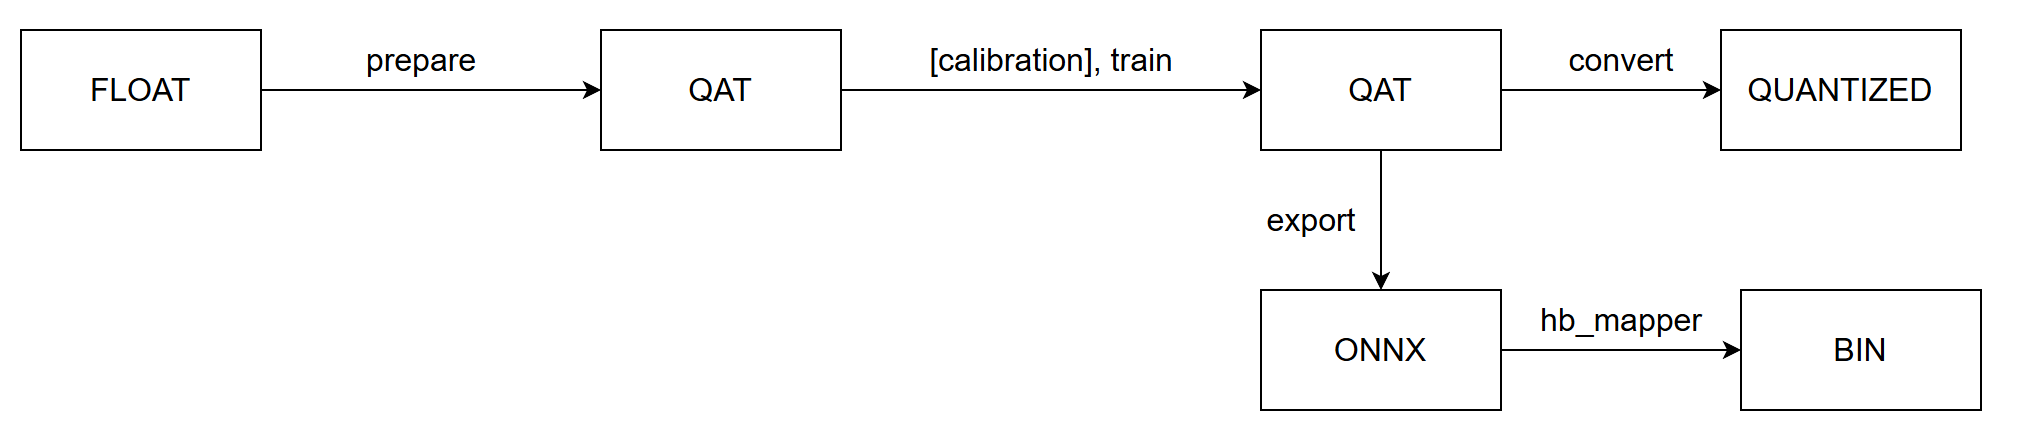
通过 prepare 将浮点模型转为 QAT 模型,训练之后导出为 onnx 格式模型,由 hb_mapper 工具转为 bin 模型。
注解
用户可以通过 convert 过程得到异构定点模型,用于模型精度评测。
7.4.5.3. 算子限制
由于异构模型对接的是 horizon_nn,因此,其算子的支持情况和 horizon_nn 相同。
7.4.5.4. 主要接口参数说明
horizon_plugin_pytorch.quantization.prepare_qat_fx
设置 hybrid=True 来开启异构模型功能。
用户可以通过设置 hybrid_dict 参数来强制指定某些 BPU 支持的算子跑在 CPU 上。
horizon_plugin_pytorch.utils.onnx_helper.export_to_onnx
导出 onnx 模型,从而对接 hb_mapper 。
注解
该接口也支持非异构模型,其导出的 ONNX 格式模型仅用于可视化。
horizon_plugin_pytorch.quantization.convert_fx
异构模式可以复用 convert_fx 把伪量化模型转换成异构量化模型,用于评测模型精度。
注意
通过 convert_fx 得到的异构量化模型无法进行部署。目前仅用于评测模型精度。
7.4.5.5. 流程和示例
改造浮点模型。
插入 QuantStub 与 DeQuantStub ,保持与非异构的用法一致。
如果第一个 op 是 cpu op ,那么不需要插入 QuantStub 。
如果最后一个 op 是 cpu op ,那么可以不用插入 DeQuantStub 。
对于非 module 的运算,如果需要单独设置 qconfig 或指定其运行在 CPU 上,需要将其封装成 module ,参考示例中的 _SeluModule 。
设置 march 。
设置 qconfig 。保留非异构模式下在 module 内设置 qconfig 的配置方式,除此以外,还可以通过 prepare_qat_fx 接口的 qconfig_dict 参数传入 qconfig,具体用法见接口参数说明。
对于 BPU op ,必须保证有 qconfig ,如果其输入 op 不为 QuantStub ,那么还需要保证该输入 op 有 activation qconfig 。
对于 CPU op ,qconfig 不会对其产生任何影响,但如果后面接 BPU op ,则必须有 qconfig 。
推荐设置方式:先设置全局 qconfig 为 horizon.quantization.default_qat_8bit_fake_quant_qconfig (或者 horizon.quantization.default_calib_8bit_fake_quant_qconfig ,根据 calibration 或 qat 阶段选择) ,在此基础上根据需求修改,一般而言,只需要对 int16 和高精度输出的 op 单独设置 qconfig 。
设置 hybrid_dict 。可选,具体用法见接口参数说明,如果没有主动指定的 CPU 算子,可以不设置 hybrid_dict 。
调用 prepare_qat_fx 并进行 calibration 。参考 horizon_plugin_pytorch 开发指南章节中的 Calibration 小节内容。
调用 prepare_qat_fx ,加载 calibration 模型并进行 QAT 训练。参考 horizon_plugin_pytorch 开发指南章节中的 量化感知训练 小节内容。
调用 convert_fx 。可选,没有评测定点模型精度的需求时可以跳过。
调用 export_to_onnx 。也可以使用 torch.onnx.export 但需要遵守 export_to_onnx 接口说明中的注意事项。
使用 hb_mapper 转换 onnx 模型。转换后需检查算子是否运行在预期的设备上,在部分情况下, hb_mapper 仍然需要设置 run_on_cpu 参数。比如:虽然 conv 在 QAT 阶段没有量化,但由于其输入(上一个算子输出)经过了伪量化, hb_mapper 仍然会默认将其量化。
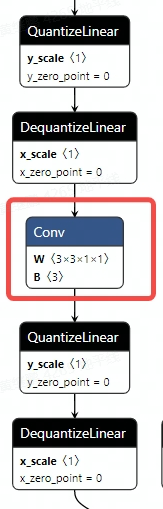
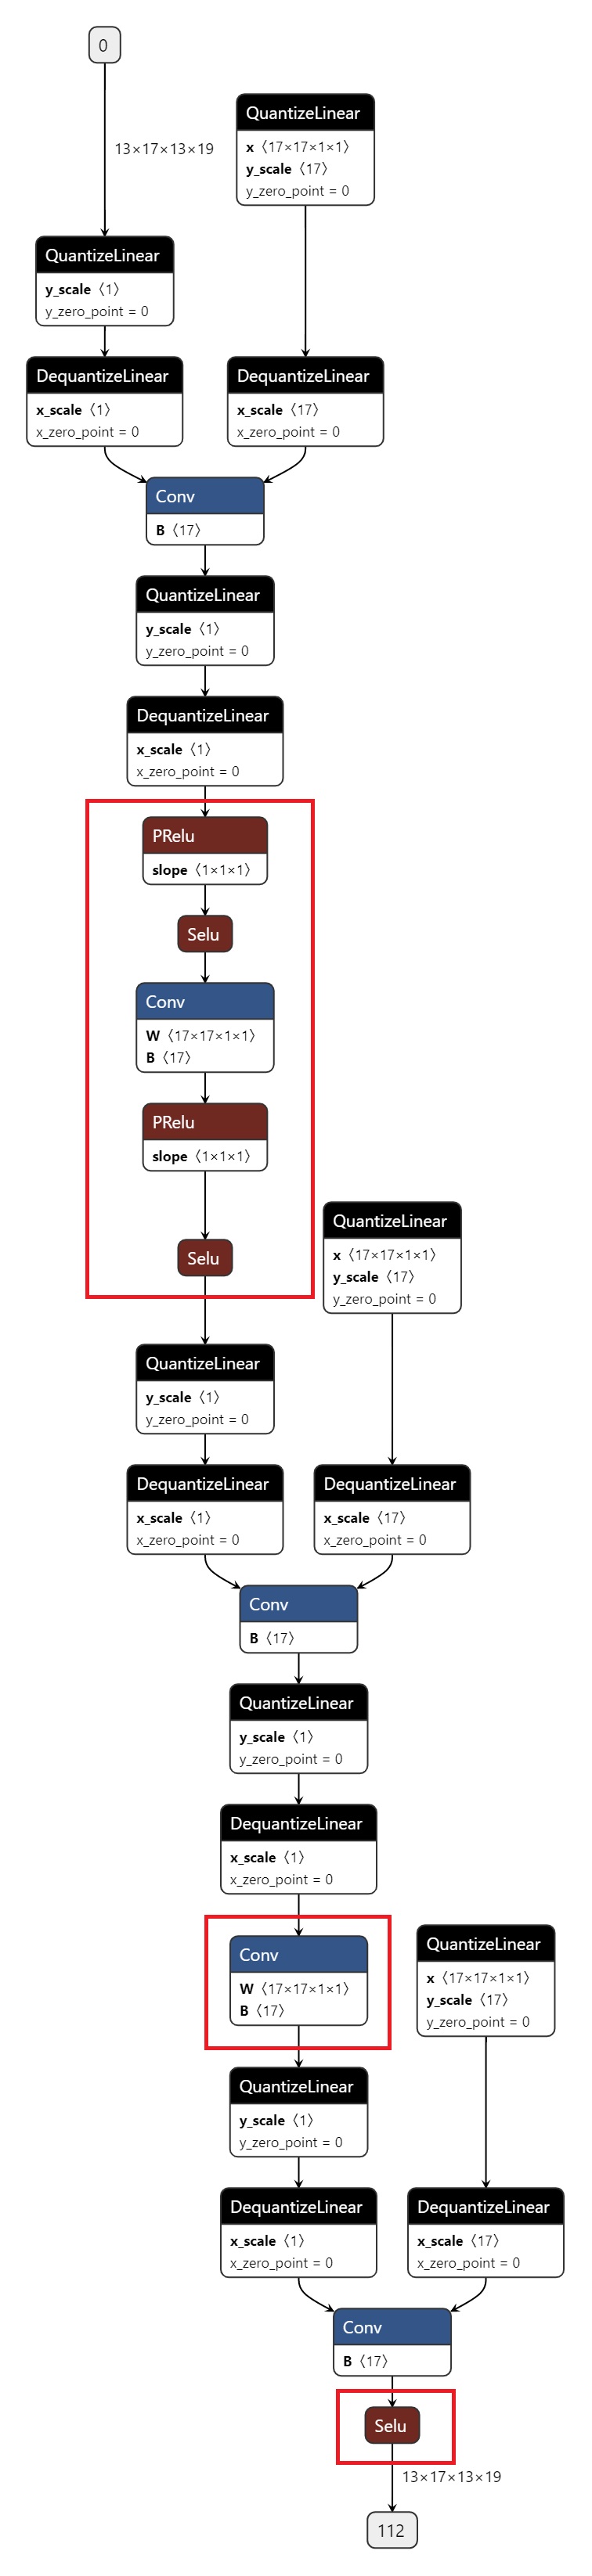
打印 QAT 模型的结果。
导出的 onnx 如图所示,红色圈出部分为 CPU 算子。
7.4.6. 精度调优工具使用指南
由于浮点转定点过程中存在误差,当您在使用量化训练工具时,难免会碰到量化模型精度掉点问题。通常来说,造成掉点的原因有两大类:
原有浮点模型不利于量化,如存在共享 op 或共享结构;
QAT 网络结构或配置异常,如模型中存在没有 fuse 的 pattern,没有设置高精度输出等;
某些算子对量化比较敏感,该算子的量化误差在前向传播过程中逐层累积,最终导致模型输出误差较大。
针对上述情况,量化训练工具提供了精度调优工具来帮助您快速定位并解决精度问题,主要包括如下模块:
模型结构检查:检查模型中是否存在共享 op、没有 fuse 的 pattern 或者不符合预期的量化配置;
QuantAnalysis:自动比对分析两个模型,定位到量化模型中异常算子或者量化敏感 op;
ModelProfiler:获得模型中每一个 op 的数值特征信息,如输入输出的最大最小值等。
7.4.6.1. 快速上手
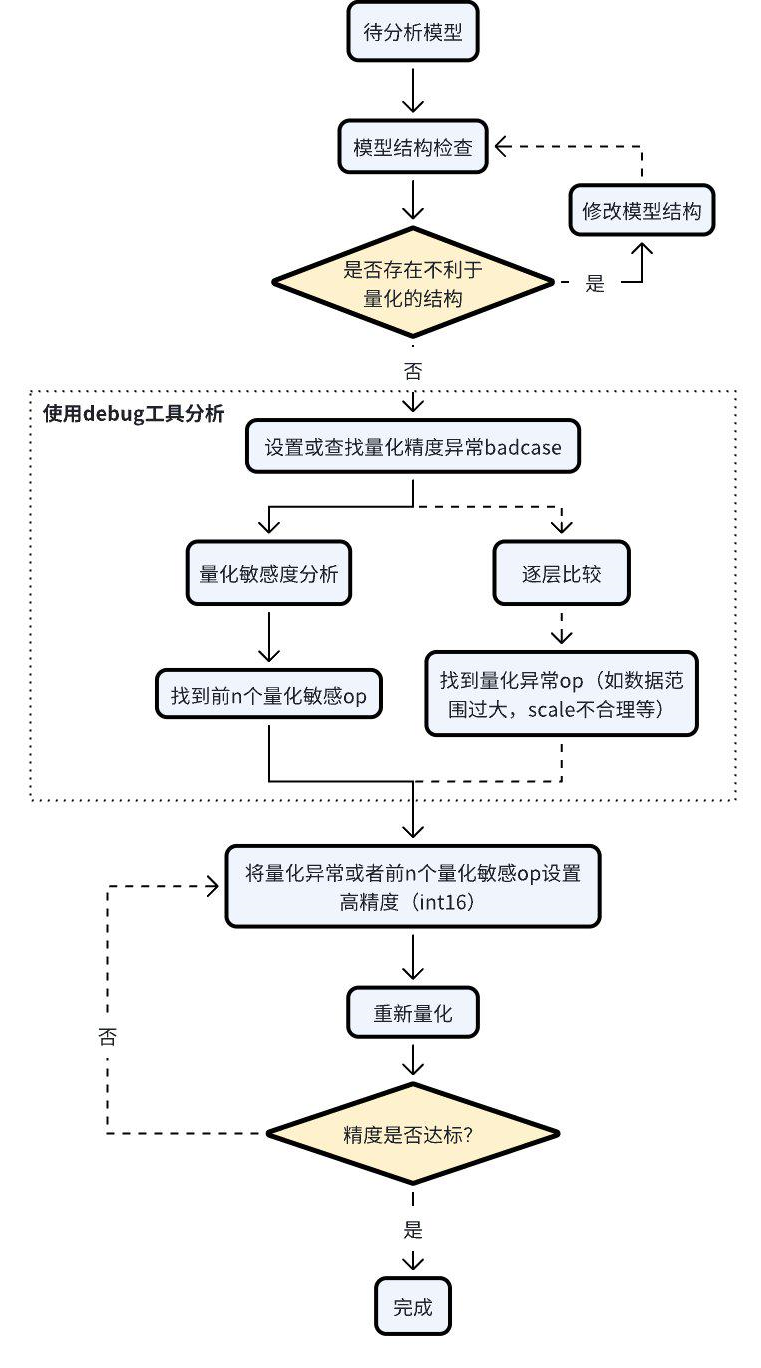
当碰到量化模型精度掉点问题时,我们推荐按照如下的流程使用精度调优工具。
检查模型中是否存在不利于量化的结构或者异常配置;
使用 QuantAnalysis 模块进行分析,具体步骤如下:
找到一个 bad case 作为模型的输入。bad case 是指基准模型和待分析模型输出相差最大的那个输入;
进行量化敏感度分析,目前的经验是 L1 敏感度排序前 n 个通常为量化敏感 op(不同的模型 n 的数值不一样,暂无自动确定的方法,需要手动尝试,如前 10 个,20 个…)。将量化敏感 op 设置高精度量化(如 int16 量化),重新进行量化流程;
或者逐层比较两个模型的输入输出等信息,检查是否存在数据范围过大或者 scale 不合理等量化异常的 op,如某些具有物理含义的 op 应设置固定 scale。
整体的流程图如下:
一个完整的例子如下。
7.4.6.2. API Reference
7.4.6.2.1. 模型结构检查
检查 calibration/qat 模型中是否存在不利于量化的结构以及量化 qconfig 配置是否符合预期。
参数
model: 待检查模型
example_inputs: 模型输入
save_results: 是否将检查结果保存到 txt 文件。默认 False。
out_dir: 结果文件 ‘model_check_result.txt’ 的保存路径。默认空,保存到当前路径下。
输出
屏幕输出:检查出的异常层
model_check_result.txt:在 save_results = True 时生成。主要由5部分组成
未 fuse 的 pattern
每个 module 的调用次数。正常每个 op 仅调用 1 次,0 表示未被调用,超过 1 次则表示被共享了多次;
每个 op 输出的 qconfig 配置;
每个 op weight(如果有的话)的 qconfig 配置;
异常 qconfig 提示(如果有的话)。
注解
prepare_qat/prepare_qat_fx 流程中也已集成该接口,您可以设置 verbose=1 打开该检查功能。我们推荐您在进行 QAT 训练之前,使用此接口进行检查,并根据检查结果对模型做针对性的调整。
7.4.6.2.2. QuantAnalysis 类
QuantAnalysis 类可以自动寻找两个模型输出最大的 bad case,并以此作为输入,逐层比较两个模型的输出。此外,QuantAnalysis 类还提供计算敏感度功能,您可以尝试将敏感度排名 topk 的节点设置高精度,如 int16 量化,来提升量化模型精度。
参数
baseline_model: 基准模型(高精度)
analysis_model:待分析的模型(精度掉点)
analysis_model_type: 待分析的模型类型。支持两种输入
fake_quant:待分析的模型可以是精度掉点的 calibration/qat 模型,此时基准模型可以是原始浮点模型或者一个精度达标的 int8/int16 混合配置的 calibration/qat 模型
quantized:待分析的模型是精度掉点的定点问题,此时基准模型必须是一个精度达标的 calibration/qat 模型
out_dir:指定比较结果的输出目录
该类中各个 method 如下。
7.4.6.2.2.1. auto_find_bad_case
自动寻找导致两个模型输出最差的 badcase。
参数
data_generator:dataloader 或者一个自定义的迭代器,每次迭代产生一个数据
num_steps:迭代 steps 次数
metric:指定何种 metric 作为 badcase 的 metric。默认使用 L1 最差的结果。支持 Cosine/MSE/L1/KL/SQNR/custom。若为 custom,表示使用自定义的 metric 计算方法,此时 custom_metric_func 和 custom_metric_order_seq 两个参数必须不为 None
device:指定模型运行 device
custom_metric_func:自定义模型输出比较函数
custom_metric_order_seq:自定义模型输出比较函数的排序规则,仅支持 “ascending”/”descending”,表示升序/降序
7.4.6.2.2.2. set_bad_case
手动设置 badcase。
参数
data: badcase输入
7.4.6.2.2.3. load_bad_case
从指定的文件中加载 badcase。
参数
filename:指定的文件路径
7.4.6.2.2.4. save_bad_case
将 badcase 保存到 {self.out_dir}/badcase.pt 文件。
7.4.6.2.2.5. set_model_profiler_dir
手动指定 model_profiler 的输出保存路径。
某些情况下,在 QuantAnalysis 初始化之前,ModelProfiler 就已定义并运行,此时可以直接指定已有的 ModelProfiler 路径,跳过 QuantAnalysis 的 run 步骤,直接比较两个模型的输出。
参数
baseline_model_profiler_path:基准模型的 profiler 路径
analysis_model_profiler_path:待分析模型的 profiler 路径
7.4.6.2.2.6. run
运行两个模型并分别保存模型中每一层的结果。
参数
device:模型运行的 device
7.4.6.2.2.7. compare_per_layer
比较两个模型中每一层的结果。
输出
abnormal_layer_advisor.txt: 所有异常层,包括相似度低/数据范围过大/输入没有归一化/输出没有高精度 等情况
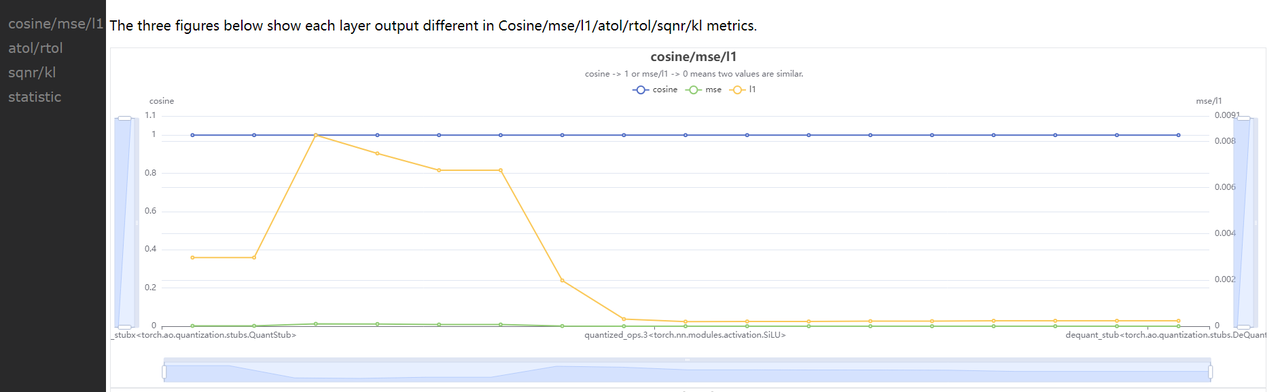
profiler.html: 可视化展示所有 metric 指标及模型中每一层的数据范围 diff
compare_per_layer_out.txt: 以表格的形式展示模型中每层 layer 的具体信息,包括各种指标、数据范围、量化 dtype 等。从左到右每一列分别表示:
Index:op index
mod_name:该 op 名字,若 op 为 module 类型,则显示该 module 在模型中的 prefix name,若为 function 类型,则不显示
base_op_type:基准模型中该 op 的 type,可能是 module 类型或者 function 名称
analy_op_type:待分析模型中该 op 的 type,可能是 module 类型或者 function 名称
Shape:该 op 输出的 shape
quant_dtype:该 op 输出的量化类型
Qscale:该 op 输出的量化 scale
Cosine:该 op 在两个模型中输出的余弦相似度
MSE:该 op 在两个模型中输出的 MSE 距离
L1:该 op 在两个模型中输出的 L1 距离
KL:该 op 在两个模型中输出的 KL 相似度
SQNR:该 op 在两个模型中输出的 SQNR 相似度
Atol:该 op 在两个模型中输出的绝对误差
Rtol:该 op 在两个模型中输出的相对误差
base_model_min:基准模型中该 op 输出的最小值
analy_model_min:待分析模型中该 op 输出的最小值
base_model_max:基准模型中该 op 输出的最大值
analy_model_max:待分析模型中该 op 输出的最大值
base_model_mean:基准模型中该 op 输出的平均值
analy_model_mean:待分析模型中该 op 输出的平均值
base_model_var:基准模型中该 op 输出的方差
analy_model_var:待分析模型中该 op 输出的方差
compare_per_layer_out.csv: 以 csv 的格式展示每层的具体信息。内容和 compare_per_layer_out.txt 完全一致,csv 文件的存储格式方便您通过 excel 等软件打开分析。
7.4.6.2.2.8. sensitivity
模型中各个节点的敏感度排序。适用于 float 转 calibration/qat 的精度掉点问题。
注意
sensitivity 函数不支持计算 hbir 模型的敏感度。
参数
device:指定模型运行的 device
metric:相似度排序的 metric,默认 L1,支持 Cosine/MSE/L1/KL/SQNR
reserve:是否反序打印敏感度节点,以支持将某些 int16 算子退回 int8 来提升上板性能
输出
sensitive_ops.txt。文件中按照量化敏感度从高到低的顺序排列 op。从左到右每一列分别表示:
op_name:op 名字,
sensitive_type:计算量化敏感的类型,包括三种
activation:仅量化该 op 输出的量化敏感度
weight:仅量化该 op 权重的量化敏感度
both:同时量化该 op 输出和权重的量化敏感度
op_type:op 类型
metric:计算敏感度的指标。按照敏感度从高到低的顺序排序。支持 Cosine/L1/MSE/KL/SQNR 五种指标。默认使用 L1。
L1:取值范围 [0, +∞],数值越大则该 op 对量化越敏感(从大到小排序)
Cosine:取值范围 [0,1],越接近 0 则该 op 对量化越敏感(从小到大排序)
MSE:取值范围 [0, +∞],数值越大则该 op 对量化越敏感(从大到小排序)
KL:取值范围 [0, +∞],数值越大则该 op 对量化越敏感(从大到小排序)
SQNR:取值范围 [0, +∞],数值越小则该 op 对量化越敏感(从小到大排序)
sensitive_ops.pt。使用 torch.save 保存的敏感度排序的列表,方便您后续加载使用。列表格式见返回值部分说明。
返回值
敏感度 List,List 中每个元素都是记录一个 op 敏感度信息的子 list。子 List 中从左到右每一项分别为 [op_name, sensitive_type, op_type, metric1, metric2, ...]。
整个 List 示例如下。
您可以将量化敏感度排名前 n 的 op 配置高精度(如int16)来尝试提升量化模型精度。
7.4.6.2.2.9. clean
清除中间结果。仅保留比较结果等文件。
7.4.6.2.3. ModelProfiler 类
统计模型 forward 过程中,每一层算子的输入输出等信息。
参数
model: 需要统计的模型
out_dir: 相关文件保存的路径
注解
该类仅支持通过 with 语句的方式使用。
该类中其中各个 method 如下。
7.4.6.2.3.1. get_info_manager
获得管理每个 op 信息的结构体。
返回值
管理存储的每个 op 信息的结构体 OpRunningInfoManager。其中两个重要的接口如下。
7.4.6.2.3.1.1. table
在一个表格中展示单个模型统计量。存储到 statistic.txt 文件中
参数
out_dir:statistic.txt 文件的存储路径,默认 None,存储到 self.out_dir
prefixes:需要统计的模型中 op 的 prefixes 。默认统计所有 op
types:需要统计的模型中 op 的 type。默认统计所有 op
with_stack: 是否显示每个 op 在代码中对应的位置
输出
statistic.txt 文件,从左到右每一列分别为:
Index: op index
Op Name:op type,module 类名或者 function 名
Mod Name:若是 module 类,则显示该 module 在模型中的 prefix name;若是 function 类型,则显示该 function 所在的 module prefix name。
Attr:input/output/weight/bias
Dtype:tensor 的数据类型
Scale:tensor 的 scale
Min:当前 tensor 的最小值
Max:当前 tensor 的最大值
Mean:当前 tensor 的平均值
Var:当前 tensor 中数值的方差
Shape:tensor shape
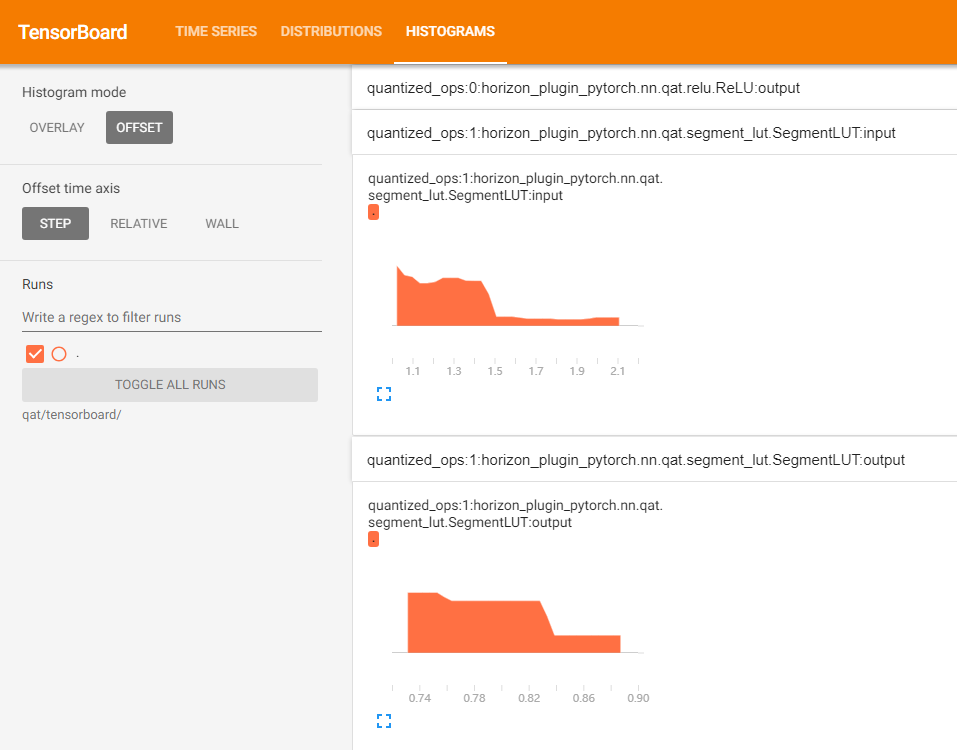
7.4.6.2.3.1.2. tensorboard
在 tensorboard 中显示每一层输入输出直方图。
参数
out_dir: tensorboard 相关文件保目录。默认保存到 self.out_dir/tensorboard 目录下
prefixes:需要统计的模型中 op 的 prefixes。默认统计所有
types:需要统计的模型中 op 的 type。默认统计所有
force_per_channel:是否以 per_channel 量化的方式展示直方图
输出
tensorboard 文件,打开后截图如下。